
Section Four
Setting up your first campaign
Whew! We’ve done a lot of foundational work so far and now’s the fun part – actually setting up your first campaign. Follow along with the screenshots and these instructions. Your ads will be running in no time.
Your business goal—the reason you’re running the ad
Let’s begin with the end in mind: What do you want from your Facebook advertising?
If you aren’t sure about that, or you have a long list of things you want but no one priority, it’s best to get clarity about this until you move forward. Your ads won’t be as effective as they could be until you know what you really want.
This isn’t just a philosophical theory, either. The very first thing the Facebook ad platform will ask you about when you create a campaign is what that campaign’s objective is.
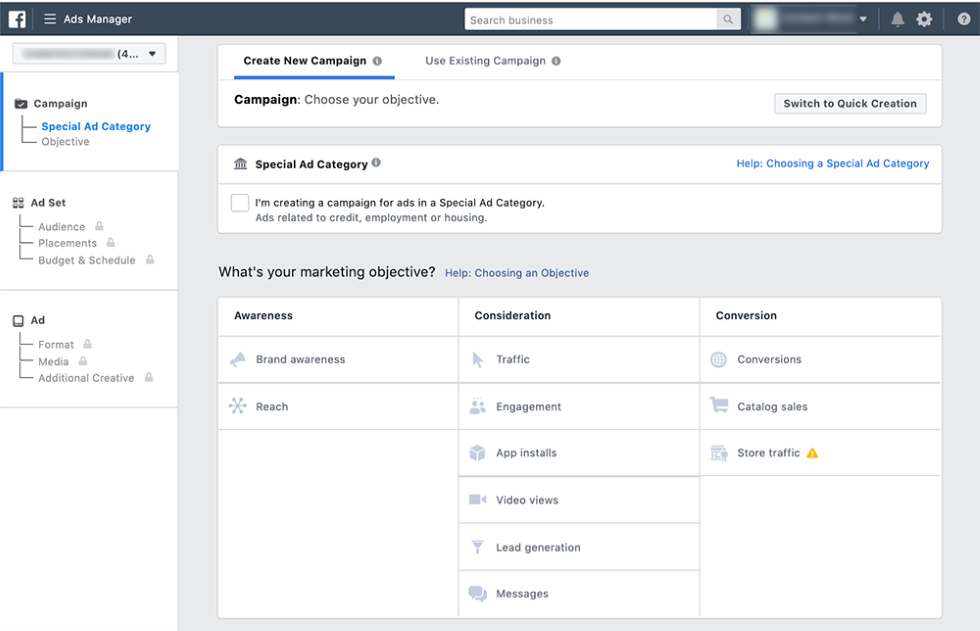
Campaign objectives will vary depending on your business model, obviously. An e-commerce store might want catalog sales, whereas a gaming app could want app installs.
But that’s only the first level of how sophisticated Facebook advertising and campaign objectives can be. For example, some advertisers who want leads may find that their lead generation ads do much better if they’ve warmed up their audience/s with a few reach ads.
The reach ads can also be used to expand a potential audience; you can show your first video ad to a large audience, see who’s interested enough to watch the first ten seconds of a video, and then show a second more conversion-oriented ad only to the people who watched the first ten seconds of the video. You could even create a lookalike audience of people who watched the video and show more conversion-oriented ads to people like them.
This is, in part, why Facebook ads are so powerful. By blending the different ad objectives, ad types, and the incredibly sophisticated audience targeting capabilities available, advertisers today can do things that advertisers 20 years ago would have been blown away by.
These types of capabilities are also exactly why Facebook has leveled the playing field for advertisers. You don’t need $30,000 worth of third-party ad tech software to do sophisticated audience nurturing and targeting like we just described. It’s all free, right there, on Facebook.
Campaign Objectives
Campaign objectives are particularly important in light of how much control we’ve given over to the algorithm. Picking the right campaign objective is one of the last levers we’ve got to manage our campaigns with, so choose it wisely.
You should also consider picking campaign objectives based on the idea of the customer journey. This is described in detail in Facebook’s “Structure for Scale” best practices – a set of techniques Facebook recommends for all advertisers now. Structure for Scale is basically the new playbook of how to advertise so you maximize the algorithm’s capabilities, rather than stunting its performance.
For more information on Structure for Scale and how to understand it and apply it, see our blog post, Facebook’s Structure for Scale: How to Prepare for Automated Media Buying. We’ve also got a FAQ page on Structure for Scale.
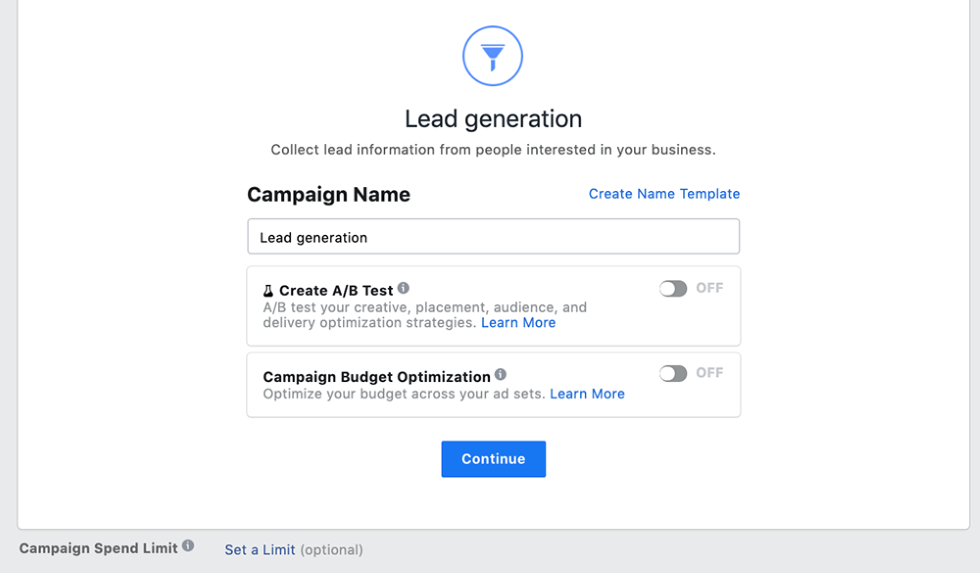
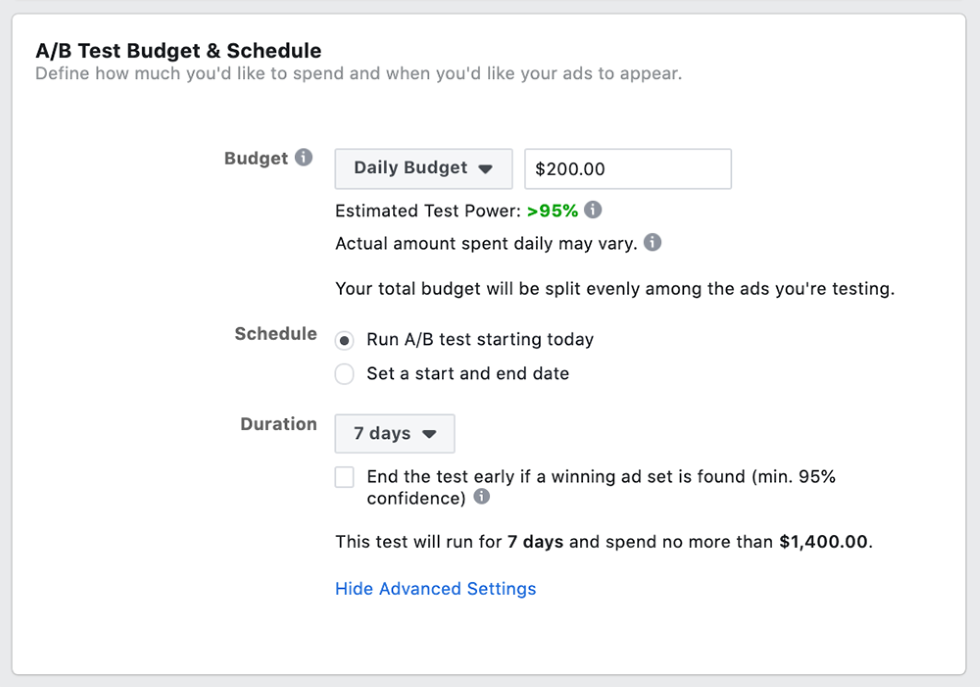
After you’ve chosen a campaign objective, you’ll be asked if you want to use Campaign Budget Optimization or if you want to create a split-test.
No matter which campaign objective you pick, you’ll be asked about split-tests and Campaign Budget Optimization. If you’ve picked an engagement objective, you’ll also be asked whether you want Post engagement, Page likes, or Event responses.
Both we and Facebook recommend you use Campaign Budget Optimization, but if you want to set up a test, it’s done in the setup interface. You can circle back later and turn Campaign Budget Optimization on in the campaign’s settings after you’ve published it.
Returning to testing, if you choose split-test in the setup interface, you can pick one of four options:
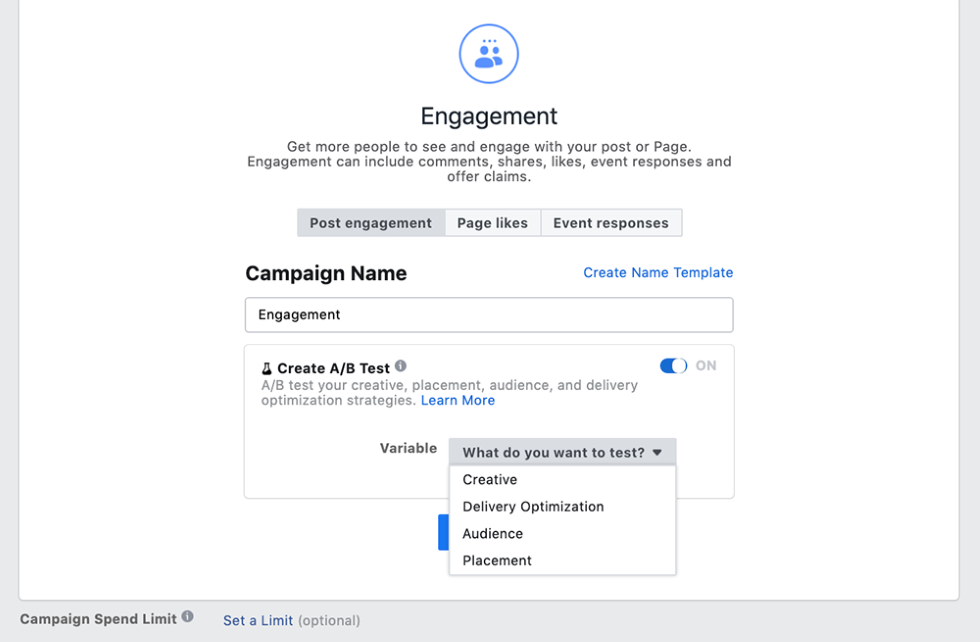
Note that you can test almost anything within a campaign by creating more than one ad set within the campaign and then changing just one thing, or “variable” (the A/B/C of the a/b test) across each ad set.
Incidentally, this is how Facebook automatically sets up a/b tests:

If you’re testing ad creative, it is also possible to put several different ad creatives within one ad set. This is common practice, and it can work well, but be aware that creating a large number of ad sets is not Facebook’s recommended best practice right now, especially if you want your campaigns to scale.
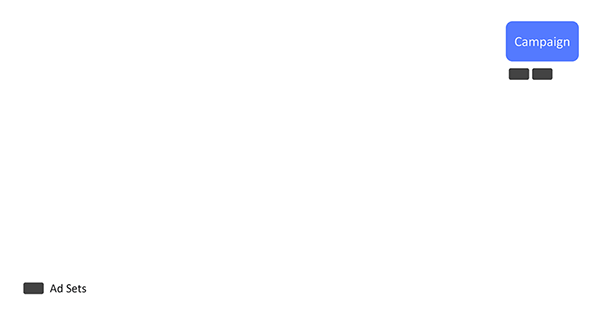
Per the “Structure for Scale” best practices we mentioned earlier, Facebook recommends a simplified campaign structure like this:
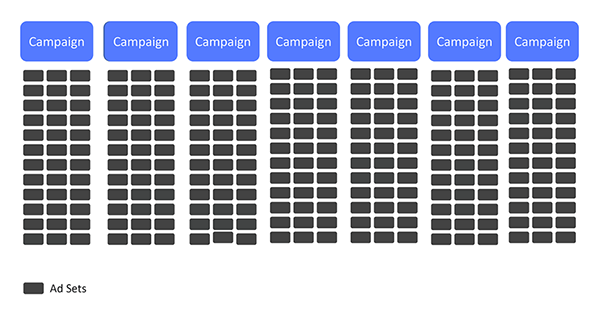
Rather than using many ad sets in a campaign, like this:
So what do you do? Follow Facebook’s Simplified Campaign Structure to the letter, or just ignore it and create dozens of ad sets for the testing you know is so critical.
Actually, you compromise. This works out best because it’s not usually a good idea to try to test everything all at once. Just as “Rome wasn’t built in a day,” high-performance ad campaigns aren’t built in a day, either (though there are a few shortcuts you can take).
So do create enough ad sets to test creative, but not too many. Seven would be the maximum, and four would probably be better.
Just be patient. In our experience, advertisers have to test about 20 new pieces of ad creative before they identify a new “control” or top-performing ad. We’ve built a rigorous, high-performance ad testing methodology over the course of the last few years. If you want to know more about our advanced creative testing techniques for high-volume Facebook ad accounts, start with our blog post, 5 Facebook Best Practices For A|B Testing New Ad Creative, then read the section Hidden Challenges in Creative Testing of our whitepaper, 2020 Definitive Guide of Facebook Ads.
We believe creative strategy and testing is the single best way to achieve success with Facebook advertising (or with any type of social advertising). After profitably managing over $1.5 billion worth of social media ad spend, if we could give only one piece of advice, it would be this: Test. Test again. Test more.
An understanding of who you want to reach: Setting up Audiences
So now you know what you want from your ads; what action you want people to take. Now let’s get specific about who you want to take that action – who your audience is. Who you pick for your audience (or, who Facebook picks for you) is arguably as important as your ads.
Because of the way the algorithm works now when you set an objective for your campaign, you’re already picking your audience, at least in part. This is because the algorithm will take your defined audiences and then go find people within those audiences who are most likely to complete the objectives you want. In other words, Facebook will show your ads to the people who are most likely to take action – to complete the objective you’ve defined – first.
So logically enough, the very next screen you’ll see when you set up a new campaign and decide about testing… is the audience settings.
Audience Selection
Audience selection, like ad creation, is an art and a science unto itself. But if you’ve never run a Facebook ad before, and you don’t have a list or customer file, here’s where to start:
- Pick a demographic profile that’s well-defined but not too specific.
- In the “Detailed Targeting” section, search for some of your larger competitors. Add one major competitor for each audience, using the same demographic profiles.
This is your first test of audiences. Pick 3-5 competitors that are large enough so you can target their audiences and use the demographic profile you’ve selected. Most Facebook experts recommend a minimum “potential reach” for each audience of 1-2 million people. Create those 3-5 audiences so the only difference between them is your competitor. The demographics, geographic targeting, and even your ad creative should all be the same across each ad set.
From there, use the reporting within your Facebook Ads Manager to show you which placements, demographics, and other variables might be worth additional tests. And remember ONLY TEST ONE THING AT A TIME. Otherwise, you won’t know what’s actually driving results. Facebook’s testing platform has some quirks, so the cleaner your testing methodology is, the better.
If you do have a customer file with email addresses or an email subscriber list, upload that and use it as a Custom Audience or as the basis for a Lookalike Audience.
To do this, go to Business Manager > Audiences. Click the blue-button in the top left and select “Custom Audience”.
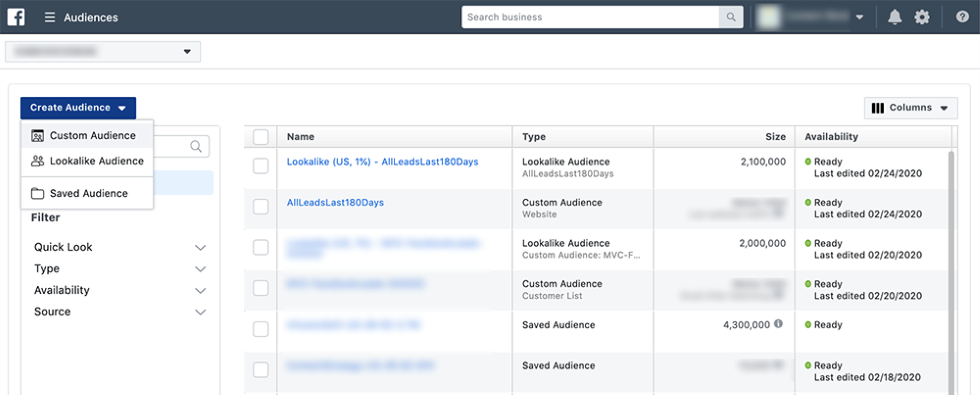
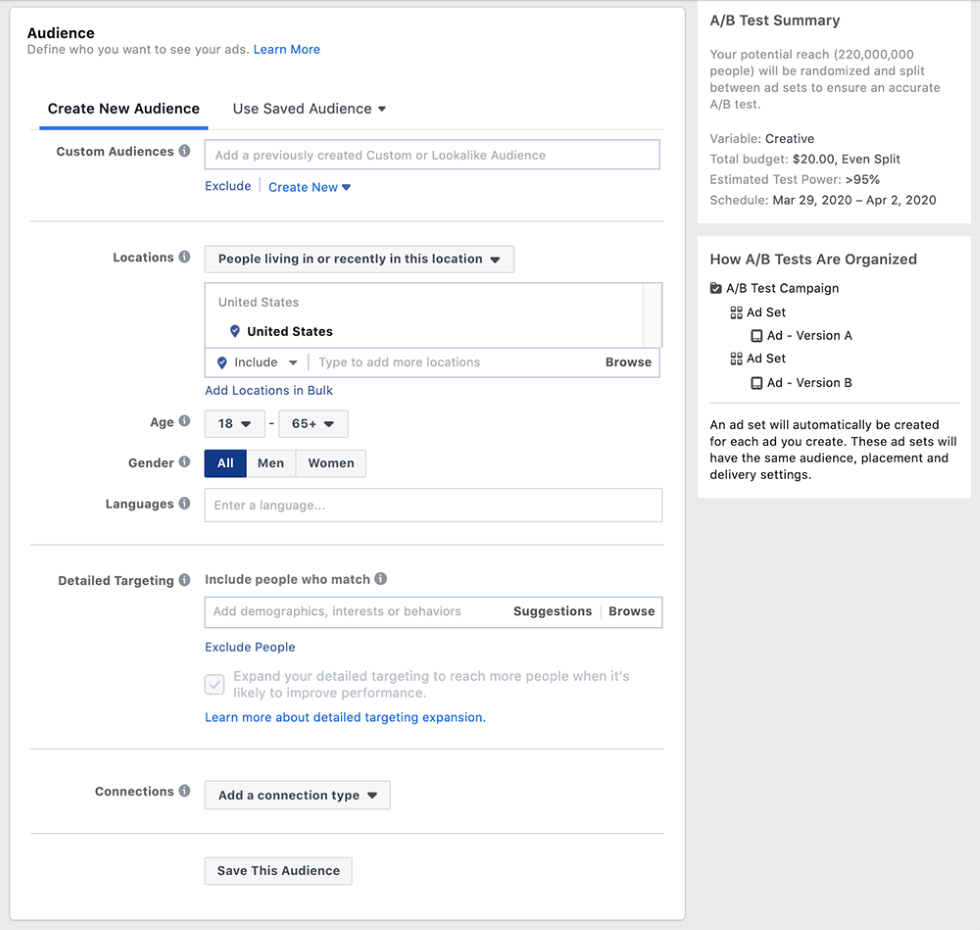
You’ll see a pop-up screen like this:
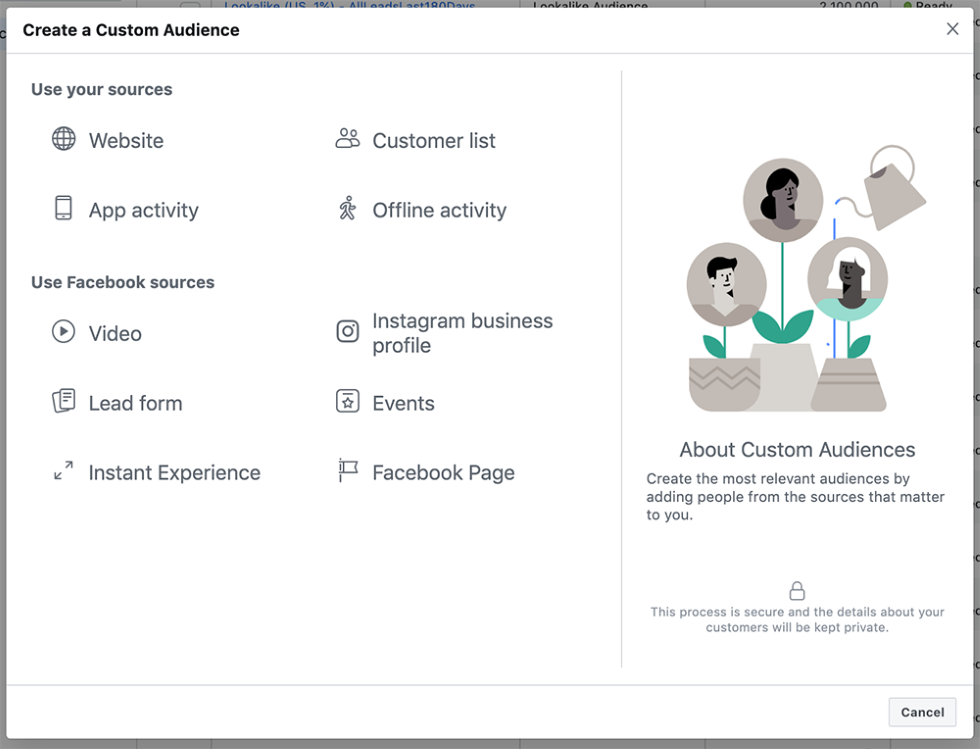
Clearly, there’s a lot to choose from! Now you’re starting to see how powerful audiences and audience selection is… and why you want to proceed carefully as you test new audiences. It’s great to have so many choices, but that can make for disorganized testing.
If you wanted to advertise a gaming app, you’d have several options here: The “App activity” option might be the most interesting. Also, if you’ve set up SDK, you could advertise to, say, only people who had installed your app, or only people who have completed a purchase event. In addition, if your advertising budget was limited, even severely limited, you could still grow your user base if you only advertised to super-high value people.
Custom Audiences
Also, note that we’re looking at Custom Audiences here. You can always create a “Lookalike Audience” from any Custom Audience, and you can also segment these audiences out in very strategic ways.
We do so much audience targeting and selection that we’ve actually built a tool that lets advertisers create potentially hundreds of super-defined audiences with just a few clicks. We can even target people based on their expected lifetime value, and we can adjust those lifetime values in such a way that we can direct the algorithm to go find us, super-high-value users.
This level of audience targeting and audience fatigue management gives us a lot of control. It also lets us extend the life of creative assets, and it lets us squeeze every dime of performance out of ad budgets. See how we do it.
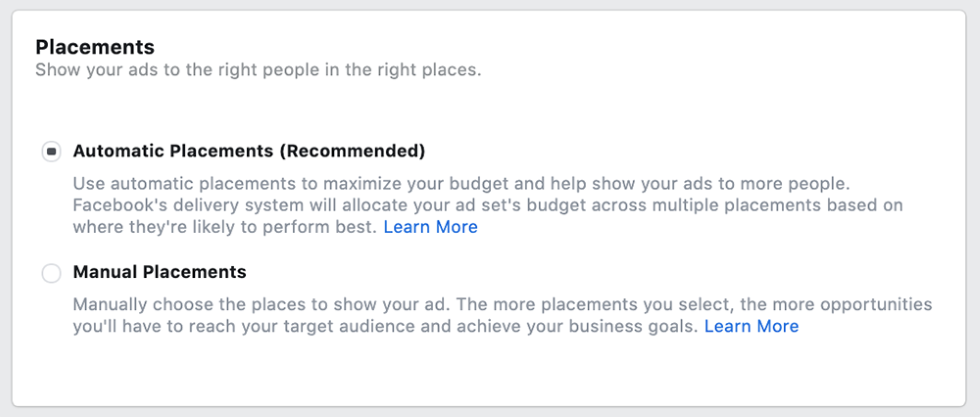
After you’ve picked an audience, Facebook will ask you where you want your ads to show. Per Facebook’s Structure for Scale best practices, we recommend choosing “Automatic Placements”. This will let the algorithm pick from more than ten possible places where your ads will show. And as the algorithm knows more about what works or doesn’t work, and it has a far better able to analyze the data available, it’s best to just let it pick where your ads will show.
The next thing you’ll have to decide is delivery optimization. Do you want your ads to be charged by:
- Link clicks (you are charged every time someone clicks the link in your ads)
- Impressions (By CPM, or “clicks per thousand views”. In other words, you are charged based on how many of thousands of people see your ads)
- Post Engagement (Choose from likes, shares, or comments)
- Daily unique reach (you are charged based on how many people see your ad once per day)
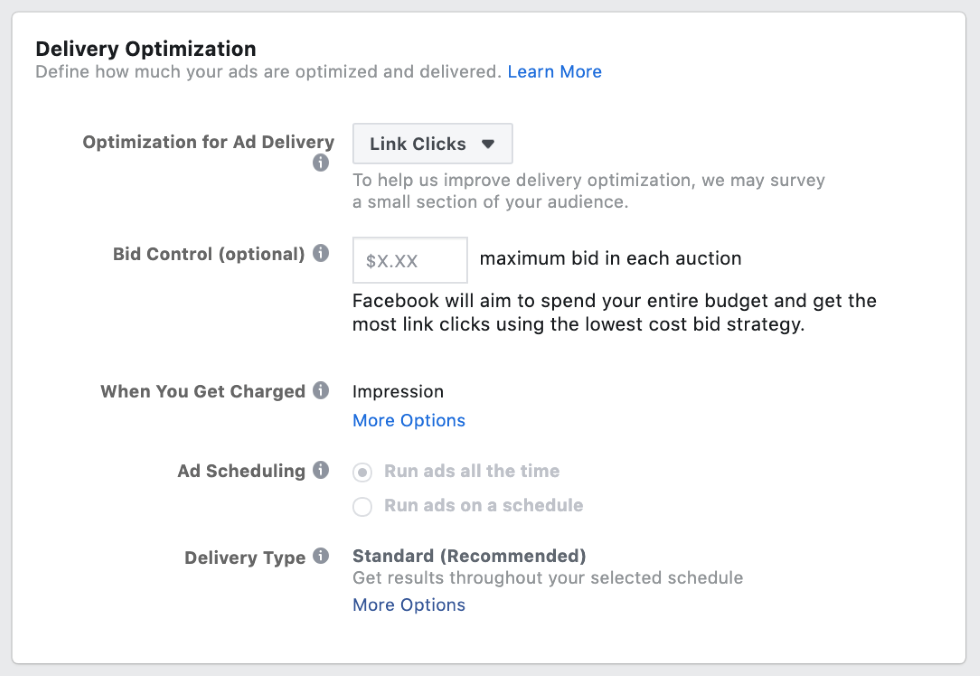
This is also where you can decide if you want to run your ads on a schedule. For instance, if your reporting shows that your ROAS (return on ad spend) is terrible after 9 pm and before 6 am, you might want to schedule your ads so they don’t show between those times.
Finally, you can choose the delivery type: Accelerated or Standard. Standard spreads out how often your ads show across the day. Accelerated spends your ad budget as soon as possible.
So by now, we’ve got an objective for our ads, and we know who we want to show those ads to. Next up is how much we want to spend.
A daily or lifetime budget for your ad
The best advice here is the same advice we’ve given before: Give the algorithm what it needs to do its job. That means bidding high enough and allocating enough budget.
And now, finally, we can get to the ads themselves.
Setting your ads up for the success of your first campaign
There are five areas of ad setup:
- Identity
- Format
- Media
- Links
- Tracking
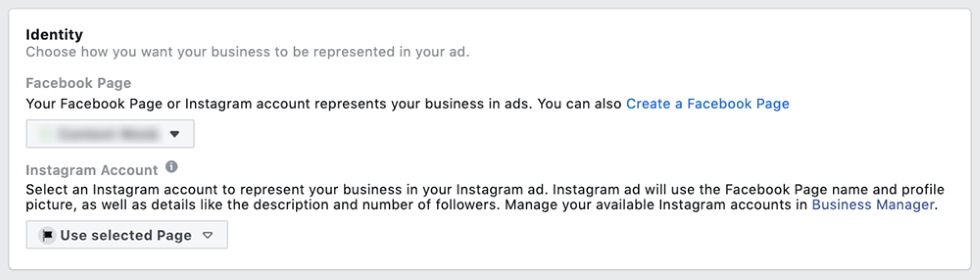
Identity is straightforward. Just tell Facebook which page you want to be associated with your ads. If you’re running ads on Instagram, you’ll also need to assign an Instagram page.
Identity
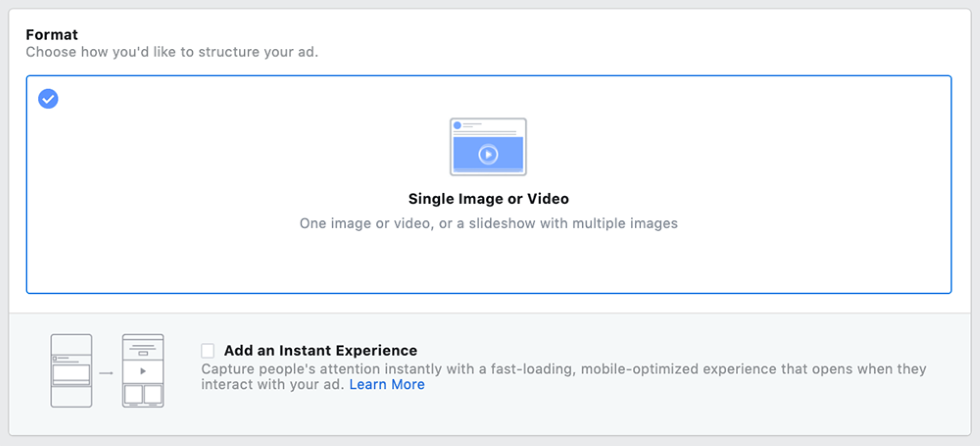
Format
The format is where things get interesting. You can choose from a single image ad, video ad, a slideshow ad, or an “Instant Experience” ad (which used to be called “Canvas”). Instant Experience ads are for mobile devices only and used the least. They typically require considerable creative development, but for the right brands, they can work well.
Single image ads are the bread and butter of Facebook ad creative. They can work extremely well and – depending on your audience and your objectives – it’s possible they could even outperform a video ad.
Here’s an example of a simple image ad:

Video Ad
Nice, right? But for our money, video ads beat every other ad type. We’ve created tens of thousands of video ads, and we have quite a lot to say about best practices for video ad creative development and testing.
If you wish you could do video ads but you don’t have the resources to make videos, there is a clever shortcut: Adding motion to still images.
Carousel Ads
You can also create “Carousel ads” that are like a slideshow of static images. Here’s a screenshot of a carousel ad. These can work well for lead generation ads or for e-commerce sites.

Add Media
Once you’ve chosen the ad format, you’ll add your media, which will be either an image or a video. The specifications for images are here. The specs for videos are here.
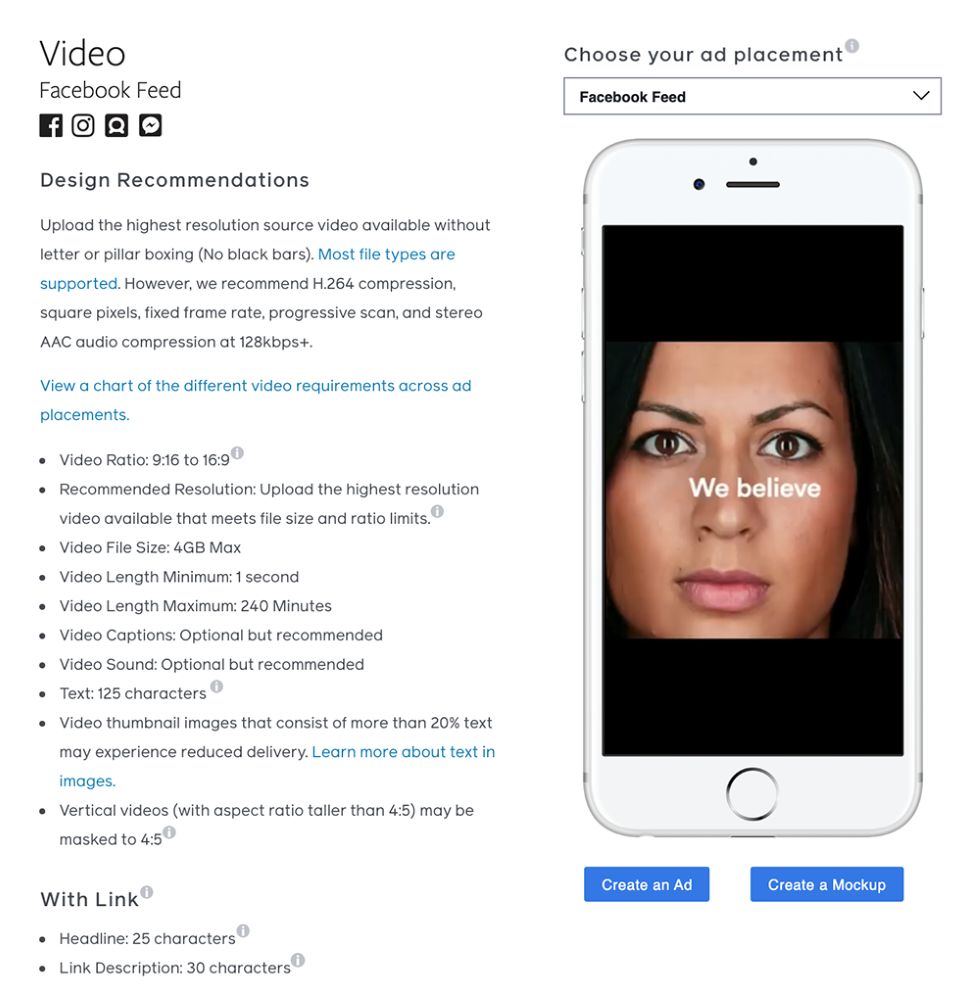
When you upload your media, make sure you include multiple aspect ratios so your ads look good on all the different placements.
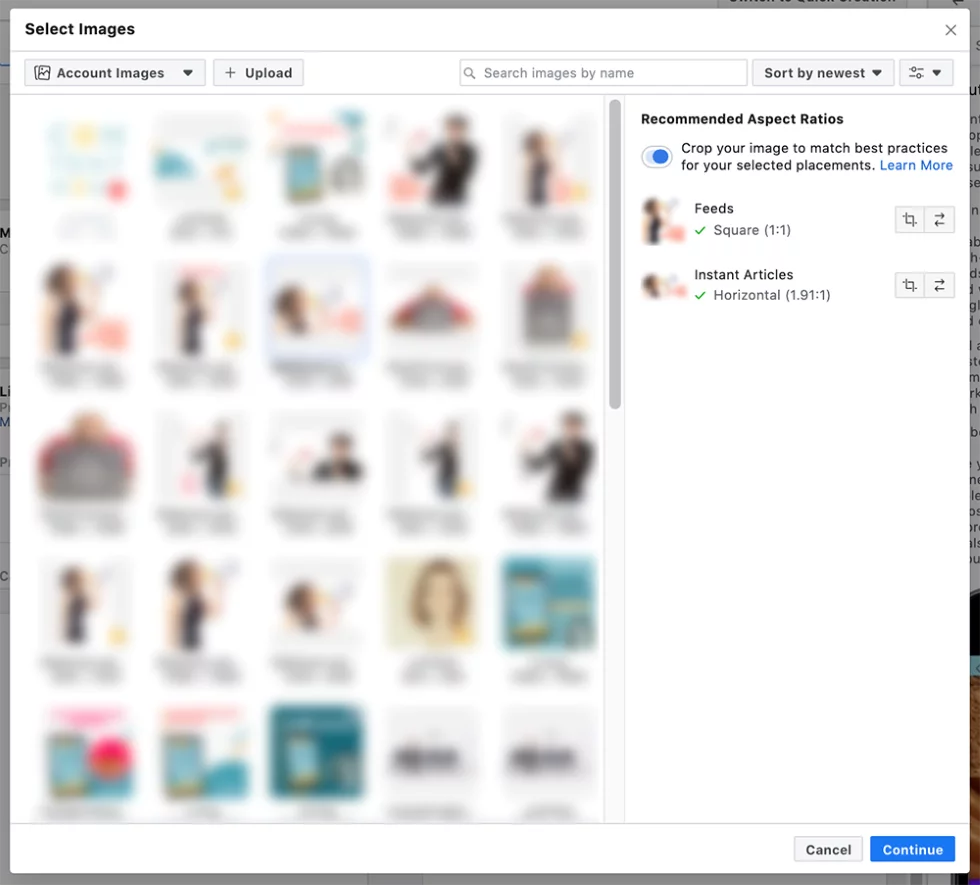
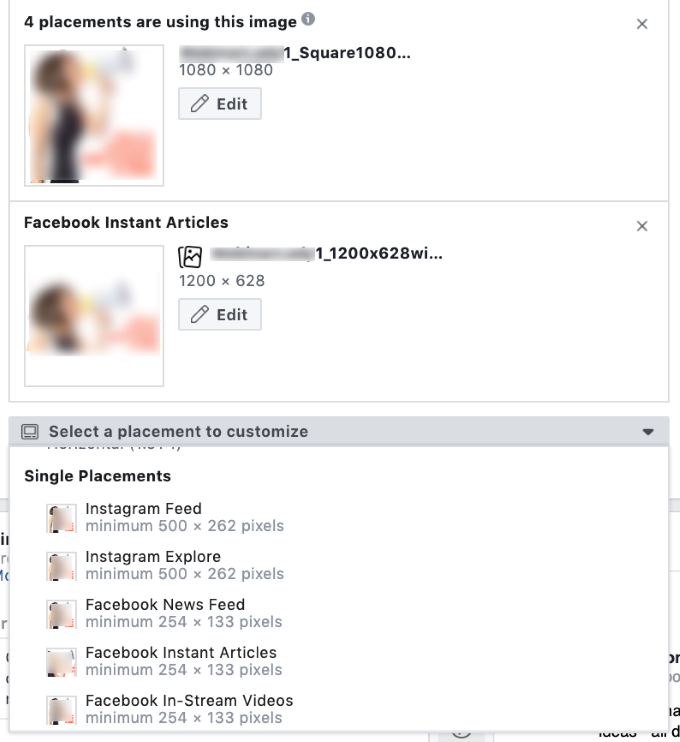
Once you’ve uploaded your media, you’ll be given another chance to review how it will look in different placements, and to make any edits as necessary.
Placements
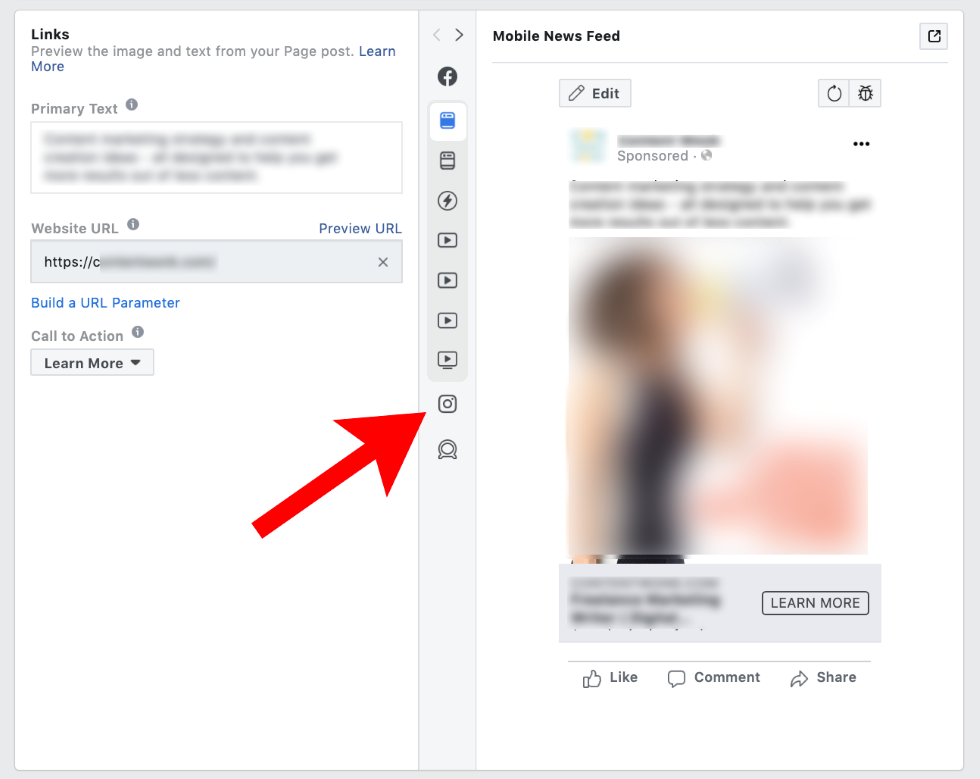
Ad Copy
Then you’ll set up your ad copy. Use the icons in the center of the panel to view your ad copy across all the placement settings. You may have to adjust your copy quite a lot so it makes sense in every placement.
Conversion Tracking of Your First Campaign
Next, you’ll have the option to turn on conversion tracking (which you’ll do, of course). For app advertisers, they’ll want to turn on App Events as well.
That will conclude the setup for your first ad. Continue this for each ad you want to test. When you’ve gotten through all the ads, click the green “Confirm” button to finalize your new campaign. This will submit it for review, which shouldn’t take much more than a few hours.
Congratulations. You’ve launched your first Facebook Ads campaign!
Check the performance of your ads in the Ad Manager, or, if you want, through third-party reporting tools. And no matter what, keep testing your ad creative. We’re available if you need help with creative strategy and development, or if you want to outsource the whole process.